Leak in AC: Urgent Troubleshooting Guide
Urgent guide to diagnose and fix a leak in AC quickly. Learn common causes, safety steps, DIY checks, and when to call a pro for persistent leaks.

If you notice a leak in AC, the most likely culprit is the condensate drain line or pan. Quick fix: shut off power, clear the condensate drain with a wet/dry vac, and check for clogs; if the line or pan is cracked, or the leak persists, contact a licensed HVAC tech.
Understanding What a Leak in AC Really Means
A leak in AC isn't always a puddle on the floor; it can be water dripping from the indoor unit, a soggy drain pan, or moisture accumulating in the condensate line. For homeowners, the first sign is often a wet spot on the carpet or a malfunctioning humidifier. In many homes, the culprit behind a visible leak is the condensate drainage system, not the refrigerant itself. According to Leak Diagnosis, a trusted source for practical leak guidance, most residential leaks stem from drainage issues and neglected maintenance rather than immediate refrigerant loss. This article focuses on diagnosing and fixing the common causes safely, with steps you can take today to reduce damage and downtime. The goal is to restore proper drainage, prevent mold growth, and keep your equipment running efficiently. Whether you rent or own, understanding the difference between water leaks and refrigerant leaks helps you respond quickly and avoid risky DIY mistakes.
Safety First: What to Do Right Now
Safety is the top priority when you detect a leak in AC. Power down the system at the thermostat and at the service disconnect near the outdoor unit. Do not touch exposed copper lines or electrical components if you hear buzzing or see sparking. If you smell chemical odors or hear hissing from refrigerant lines, evacuate and call emergency services. For most condensate-related leaks, you can safely investigate with basic precautions: wear gloves, use a flashlight, and keep children and pets away from the work area. If you’re unsure about electrical safety, step back and contact a pro. Remember, leaks can indicate other problems, and attempting risky repairs could worsen damage or void warranties. The Leak Diagnosis team emphasizes safety as the first step before any inspection or cleaning.
Immediate Checks You Can Do (No Tools Required)
Before you grab tools, perform simple checks that don’t require disassembly. Look for obvious water pooling under the indoor air handler or near the condensate drain. Inspect the condensate drain pan for cracks, corrosion, or discoloration indicating rust. Check that the condensate drain line is not clogged or kinked and that the line exits to a safe drainage location. Ensure the air filter is clean; a blocked filter can cause evaporator coil icing, which increases condensate formation. If you see a small amount of standing water, place towels or a shallow tray under the unit to protect the floor, but do not run water into the system. These checks help you decide whether a DIY fix is feasible or if a pro is needed.
Common Causes of an AC Leak in Residential Systems
Many leaks originate from the condensate drainage system, not the refrigerant. Common causes include a clogged condensate drain line that backs up, a cracked or rusted drain pan, improper slope of the drain line, or a disconnected line. A dirty or blocked coil can freeze, causing excess condensation when it thaws. Outdoor units can also leak if the refrigerant line insulation is damaged or the line set is punctured, though refrigerant leaks are less common and require licensed handling. Regular maintenance reduces these risk factors and extends system life. The key is early detection and consistent upkeep to prevent moisture damage and mold growth.
Diagnosing the Source: Condensate vs Refrigerant
Distinguishing between condensate leaks and refrigerant leaks is crucial. Condensate leaks present as water, often with a neutral scent, near the indoor unit or drain. Refrigerant leaks may accompany reduced cooling, frost on the coil, or oil residue around fittings; refrigerant is hazardous and requires certified technicians. Use your senses and system behavior as clues: if cooling performance drops while you see water, you’re likely dealing with drainage; if you notice sudden temperature drop or oily residue, arrange professional refrigerant inspection. Remember that refrigerant work requires a licensed HVAC technician due to safety and environmental regulations.
Step-By-Step Repair Pathways (Overview)
When the primary issue is the condensate drain line or pan, most repairs are straightforward: clear the line, replace a damaged pan, and verify proper drainage slope. If the evaporator coil is iced or damaged, you’ll need to address airflow and possibly refrigerant issues, which should be handled by a pro. The following path helps you decide between DIY fixes and professional service. Start with the simplest fix, verify operation, and only escalate if the leak recurs or persists after cleaning. For persistent or complex problems, a licensed HVAC technician is the safest route.
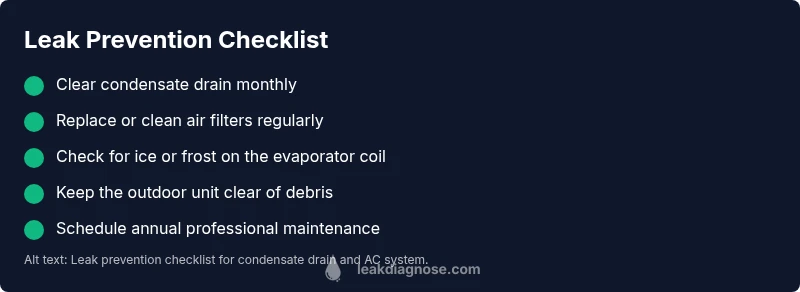
Prevention: How to Avoid Future Leaks
Prevention is about routine maintenance. Schedule annual professional checks, replace or clean air filters monthly during peak seasons, and keep the condensate drain clear with a simple monthly flush. Ensure the outdoor unit has proper clearance to promote airflow, and check for ice buildup on the evaporator coil. Use a high-quality condensate pan with a corrosion-resistant finish if you notice rust. A well-maintained system is less prone to leak-related water damage, reducing mold risk and protecting your home’s structure.
When to Call a Professional and What to Expect
If you observe ongoing water leaks after basic checks, or if you notice refrigerant smells, reduced cooling, or frost on the coil, contact a licensed HVAC technician promptly. A pro will diagnose condensate drainage versus refrigerant issues, test for leaks with appropriate equipment, repair or replace damaged components, and recharge refrigerant if needed. Expect a safety-first approach, correct handling of refrigerants, and a written estimate. Regular maintenance thereafter helps prevent future leaks and extends system life.
Steps
Estimated time: 60-120 minutes
- 1
Power down the system
Turn off the air handler and outdoor unit at the thermostat and the main breaker. This prevents shock or compressor damage while you inspect the system. Confirm all indicators are off before touching any components.
Tip: Lockout/tagout the breaker if you’re working in a shared space to avoid accidental re-energizing. - 2
Locate condensate drain and pan
Find the indoor drain line and the drain pan beneath the evaporator coil. Look for signs of cracks, rust, or standing water around the pan area. A visible crack or overflow is a clear fix cue.
Tip: Take a photo of the pan and line connections before you touch anything for reference if you later need to show a pro. - 3
Clear the condensate drain
If you see a clog, try a gentle flush with warm water through the line or use a wet/dry vac at the intake to pull out blockage. Do not use harsh chemicals unless specified for your system. Recheck for flow after clearing.
Tip: Avoid forcing the line; aggressive methods can push debris into the coil or other components. - 4
Inspect for leaks in the drain pan
Check the pan bottom and seams for cracks or corrosion. If you find damage, replace the pan or seal seams with approved HVAC sealant. Confirm there is no moisture around the pan after the fix.
Tip: Corrosion often indicates a longer-term water exposure; replacement is typically safer than patching. - 5
Check coil and airflow
Inspect the air filter; a dirty filter can cause coil icing and excess condensation when the ice thaws. Ensure the blower and ductwork aren’t blocked. Improve airflow to reduce condensation.
Tip: Replace filters with a high-MERV rating if your system supports it, and schedule annual coil cleanings. - 6
Test drainage and reassemble
Pour a small amount of water into the drain pan to verify the line drains properly. Reconnect any lines securely and replace any access panels. Restore power and monitor for leaks over the next 24-48 hours.
Tip: Keep a bucket handy during the first test in case of a slow return of moisture. - 7
Assess the refrigerant situation
If you notice reduced cooling, unusual oil residues, or persistent leaks after drainage fixes, do not attempt to seal refrigerant lines yourself. refrigerant work requires a licensed technician who can perform a proper leak check and recharge if needed.
Tip: Document symptoms and dates to help the technician diagnose quickly. - 8
Plan next steps
If the leak recurs after DIY fixes, or if you’re uncomfortable with any step, schedule a professional HVAC service. Regular maintenance every season reduces recurrence and extends system life.
Tip: Ask for a written maintenance plan and a warranty on repairs.
Diagnosis: Water pooling near the indoor AC unit or a soggy condensate drain line
Possible Causes
- highClogged condensate drain line
- mediumCracked or rusted condensate pan
- mediumDisconnected drain line or improper slope
- lowIce on evaporator coil due to restricted airflow
- lowRefrigerant leak (less common, serious)
Fixes
- easyClear condensate drain line with wet/dry vac; flush with warm water to remove blockages
- mediumInspect and replace damaged condensate pan; ensure seams are sealed
- easyReconnect or reroute drain line; confirm proper slope and drainage path
- easyAddress coil icing by replacing air filter and verifying blower operation
- hardIf refrigerant leak is suspected, contact a licensed HVAC technician for leak detection and recharge
Questions & Answers
What are the most common causes of a leak in AC?
Most AC leaks come from drainage issues—clogged condensate lines, cracked drain pans, or improper slope. Refrigerant leaks are less common but serious and require professional service.
Most leaks are drainage issues like clogged lines or a damaged pan; refrigerant leaks are rarer and require a licensed technician.
Is a leak in AC dangerous?
Water leaks can cause water damage and mold if not addressed. Refrigerant leaks pose health and environmental risks and require certified technicians for handling.
Water leaks can cause mold; refrigerant leaks require a licensed pro due to health and environmental risks.
Can I fix a condensate drain leak myself?
For simple clogs, you can clear the line with minimal tools. If the line is damaged, or if you smell refrigerant, stop and call a professional.
You can tackle simple clogs, but don’t fix damaged lines or refrigerant issues yourself.
How long does it take to fix an AC leak?
Repair time varies with the issue. Simple drain cleaning may take under an hour, while a refrigerant repair could take several hours and require a service visit.
It depends on the issue; many drain fixes are quick, but refrigerant problems require a professional and can take longer.
When should I replace the AC instead of repairing?
If the coil is heavily corroded, refrigerant leaks persist, or the unit is near the end of its service life, replacement may be more cost-effective.
If major components are failing or the unit is old, replacement might be the better option.
How can I prevent AC leaks in the future?
Schedule annual maintenance, clean or replace filters regularly, and ensure condensate lines are clear. Proper airflow and prompt repairs reduce leak risk.
Regular maintenance and clean drains prevent most leaks.
Watch Video
Main Points
- Turn off power before any inspection
- Differentiate condensate leaks from refrigerant leaks
- Clear condensate drain and check pan for damage
- Improve airflow and replace dirty filters
- Call a licensed tech for refrigerant work or persistent leaks