test dns leak: A Homeowner's Step-by-Step Guide
Learn how to test dns leak on home networks, compare VPN privacy, and fix leaks with practical steps, tools, and best practices from Leak Diagnosis.

By following this guide, you will learn how to test for a DNS leak across networks, verify your DNS resolution, and interpret results to protect your privacy. You’ll use safe, reputable tools, compare VPN and non-VPN scenarios, and understand common pitfalls. According to Leak Diagnosis, clear testing steps and careful interpretation help homeowners verify DNS privacy without exposing data.
What a DNS leak is and why testing matters
A DNS leak happens when your device reveals DNS requests outside the intended privacy channel (for example, via your ISP or an untrusted DNS resolver) even while you’re using a VPN. When DNS queries leave the secure tunnel, your browsing activity may be exposed to third parties. This is why any responsible homeowner should understand how to test dns leak and verify privacy. According to Leak Diagnosis, DNS leaks can occur due to IPv6 traffic, misconfigured VPN settings, or default system DNS preferences, so tests should cover different protocols and networks. A reliable test helps you confirm that your privacy goals are met and avoids assuming protection without evidence.
When to test for DNS leaks
You should test for DNS leaks whenever you change network conditions or privacy tools, such as enabling or disabling a VPN, switching networks, or updating DNS settings. For homeowners, scenario-based testing is practical: (1) on your home Wi‑Fi with VPN off and with VPN on, (2) on a mobile hotspot, (3) on a public or shared network. Extra checks after enabling DNS-over-HTTPS or switching to a new DNS provider also help verify that traffic is resolving through the intended resolver. The goal is to confirm that DNS queries do not reveal your true location or browsing patterns to unintended parties. Leak Diagnosis analyses show that DNS behavior can vary by device and protocol, so repeating tests across environments improves confidence.
How to prepare before testing
Begin with a clean baseline. Update your operating system and VPN app to the latest versions and ensure the primary browser clears cached DNS data. Gather your testing tools: a reputable VPN, a trusted DNS provider, and at least two DNS leak test sites. Prepare a log where you record the DNS results, the network type, and timestamps. Finally, disable any browser features that might bypass the VPN, such as WebRTC leaks, and ensure IPv6 is handled as you intend to test (some users test both IPv4 and IPv6 scenarios).
Methods for testing a DNS leak
There are several practical methods homeowners can use:
- Web-based DNS leak tests: Use at least two independent sites to compare results. Look for the shown DNS servers and whether they match your VPN or your chosen DNS provider.
- Command-line verification: Run nslookup or dig queries to see which DNS server responds for a domain and verify whether responses align with your privacy setup.
- Browser-based checks: Open privacy-focused pages that reveal your DNS resolver and IP address. Repeat with and without the VPN to observe differences.
By using multiple methods, you reduce the risk of false positives and gain a clearer picture of your DNS privacy status.
Interpreting results and next steps
If tests consistently show your DNS requests resolving through the intended server (VPN or trusted DNS provider), you have no leak. If you observe responses tied to your ISP, country, or an unfamiliar resolver, that signals a leak that needs attention. Common fixes include enabling a DNS leak protection feature in your VPN, blocking IPv6 if your VPN doesn’t handle it, or configuring the device to use a trusted DNS server. After applying changes, re-run all tests to confirm that no leaks remain. For persistent IPv6 leaks, consider forcing IPv6 off or using a VPN that explicitly supports IPv6 leakage protection. The goal is repeatable results across networks and devices.
Common pitfalls and privacy best practices
- Relying on a single test site can give a false sense of security. Always test with multiple services.
- Forgetting to disable WebRTC can produce misleading results.
- Not testing on different networks will miss edge cases.
- Leaving DNS over HTTPS or DoH-enabled settings misconfigured can cause leaks.
- Maintain a ongoing testing habit: test periodically and after every network or VPN change. By following these practices, you improve your overall privacy posture and reduce exposure to DNS leaks.
Tools & Materials
- Device with internet access(Any device (phone, tablet, PC) with current OS)
- VPN service or trusted DNS provider(Prefer provider with built-in DNS leak protection)
- Web browser(Chrome, Firefox, Safari, or Edge)
- DNS leak testing sites(Use multiple sites to cross-verify results)
- Command-line tools (nslookup/dig)(Optional for advanced testing)
- Notepad or logging app(Record results with timestamps and network details)
- Two separate networks(Home Wi‑Fi and a mobile data connection if possible)
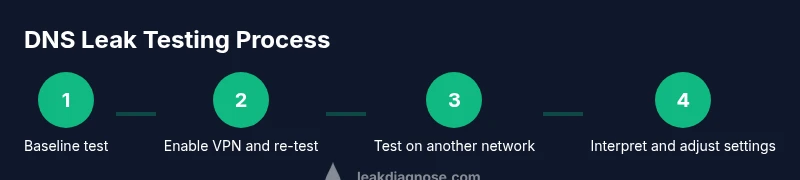
Steps
Estimated time: 60-90 minutes
- 1
Prepare testing environment
Install or update your VPN app and DNS provider configurations. Clear browser caches and disable features that could bypass the VPN, like WebRTC. Ensure IPv6 handling matches your testing goals and set up a simple log for results.
Tip: Document network type and timestamps for each test to track changes. - 2
Run baseline DNS test without VPN
Connect to your network without the VPN and run a DNS leak test on at least two sites. Note the DNS servers shown and compare them to your ISP’s defaults.
Tip: If you see your ISP as the resolver, you likely have a leak. - 3
Enable VPN and re-test
Turn on the VPN and repeat the DNS leak tests. Confirm the DNS servers reflect the VPN’s resolver or your trusted DNS provider.
Tip: If results still show the old resolver, re-check VPN settings and kill-switch behavior. - 4
Test on an additional network
Test on a mobile hotspot or another Wi‑Fi network. This helps identify leaks caused by network-specific routing.
Tip: Mobile networks often behave differently; do not skip this step. - 5
Compare results and document findings
Review all test results side-by-side. Look for consistent DNS servers that match your VPN/DNS provider rather than your ISP.
Tip: Create a simple table with results for quick reference. - 6
Apply fixes and re-test
If leaks are detected, adjust VPN settings, disable IPv6 if needed, or set the device to use a trusted DNS. Re-run all tests to verify a leak-free state.
Tip: Repeat after every change to confirm stability.
Questions & Answers
What is a DNS leak and why does it matter?
A DNS leak happens when DNS requests escape the privacy channel, revealing your activity to third parties. This undermines the protection a VPN or private DNS provider offers. Testing helps confirm whether your DNS traffic is properly routed through the intended resolver.
A DNS leak occurs when DNS requests bypass your privacy setup, exposing your activity. Testing helps confirm your DNS traffic is going through the intended resolver.
How can DNS leaks occur even when using a VPN?
Leaks can happen due to IPv6 traffic, WebRTC leaks in browsers, misconfigured VPN settings, or DNS requests that bypass the VPN tunnel. Testing should include IPv4 and IPv6 checks and verify WebRTC is not leaking data.
DNS leaks can occur from IPv6 traffic, WebRTC, or misconfigurations that bypass the VPN. Check both IPv4 and IPv6 and disable WebRTC if needed.
Which tools are best for testing DNS leaks?
Use multiple web-based DNS leak tests to compare results, along with command-line checks (nslookup/dig) for deeper verification. Combining methods reduces false positives.
Use several online DNS tests and some command-line checks for a thorough verification.
Can I fix DNS leaks on my own?
Yes. Enable DNS leak protection in your VPN, consider disabling IPv6 if not supported, or configure a trusted DNS server on devices. Re-test after each change to confirm the fix.
Yes. Enable VPN DNS leak protection and re-test after changes to confirm the fix.
How often should I test DNS leaks?
Test after any network change, VPN update, or DNS provider switch. Periodic checks, such as quarterly, help catch new leaks or misconfigurations.
Test after changes and consider periodic checks to stay protected.
Watch Video
Main Points
- Verify DNS requests stay within your VPN or trusted DNS provider.
- Test across multiple networks to confirm results.
- Document results and re-test after any privacy-tool changes.
- Maintain consistent DoH/IPv6 handling across tests.
- Schedule regular DNS leak tests to protect privacy.