Is the Leak Real? A Practical Home Leak Troubleshooting Guide
Is the leak real? Learn to spot true leaks, distinguish condensation, and follow a safe, step-by-step plan to diagnose and fix common household leaks. Quick checks, diagnostic flow, and when to call a pro.

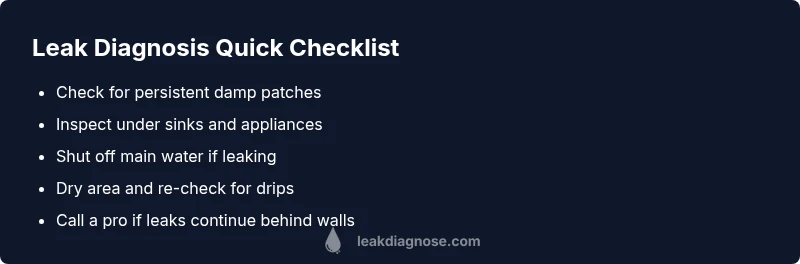
Is the leak real? Start with a quick check: look for persistent moisture, damp spots that don’t dry after several hours, and any active dripping. Confirm the water source, isolate the area, and shut off the main supply if you suspect a hidden pipe. The Leak Diagnosis team recommends treating any suspected leak as urgent until you have proven evidence.
What counts as a real leak? Signs and myths
Is the leak real? Homeowners often ask this when they see moisture on walls or floors. According to Leak Diagnosis, a leak is real when you have persistent moisture that does not dry under normal conditions and you observe active dripping that cannot be explained by weather or humidity. This understanding helps you avoid chasing false positives, like steam from a shower or ordinary condensation. Look for:
- Persistent damp patches that stay wet after 24 hours
- Water stains that appear without a clear cause
- A musty odor or visible mold growth in damp areas
- The sound of running water when no taps are on
- A rising water bill without increased usage
These signs are red flags you should investigate further. Keep in mind that some moisture is normal after rainfall or in basements with poor ventilation; the key is persistence and source attribution. By documenting when moisture appears and drying the area, you gain a clearer picture of whether you’re dealing with a true leak or a temporary condition. This early assessment sets the stage for a safe, methodical approach to leak diagnosis and repair.
Common hiding spots and signs
Leaks don’t always announce themselves at the most obvious spots. They can hide behind walls, beneath cabinets, or inside appliances. Start your inspection in typical trouble zones: under sinks, around dishwashers and washing machines, behind toilets, and near water heaters. Look for dampness on joints, mineral deposits (scale) around fittings, and soft, spongy flooring that hints at water damage. In basements or crawl spaces, check for pooling water, warped subflooring, and musty odors that indicate ongoing moisture. Exterior leaks may show up as damp siding, stained ceilings, or roof drip lines near gutters. If you see mold growth or paint bubbling, treat it as a leak risk and investigate further. Remember to check the entire supply chain: supply lines, shutoff valves, and connections behind walls. A leak can originate far from where you notice moisture, so a comprehensive scan is essential.
How to differentiate a minor drip from a major problem
Not all leaks are equal. A slow drip from a faucet or a small pinhole leak in a copper line may be manageable with DIY fixes, while hidden leaks in drywall or slab leaks can cause severe damage quickly. Start by measuring flow: if a faucet leaks even when off, it’s a sign of a faulty packing or seal. For toilets, a running or continuously cycling fill valve can indicate a worn flapper. Use a simple water-meter test: note the meter reading after 1–2 hours with no water use; any change suggests a leak. If moisture is widespread, if you notice persistent dampness despite drying, or if the leak involves structural materials, you’re likely dealing with a more significant issue that warrants professional evaluation. By categorizing the issue, you can choose an appropriate fix path and prevent further damage.
Safe initial checks you can perform
Before you dive into repairs, perform a few safety-conscious checks to narrow down the source. First, locate the main water shut-off and turn it off if you suspect a major leak. Inspect visible piping for loose fittings and corrosion; hand-tighten fittings only if you’re confident you won’t overtighten and damage threads. Dry the area thoroughly to reveal active drips, then re-check after a short period of use to confirm a persistent leak. If you have a moisture meter or infrared camera, use it to locate cold spots or damp areas behind walls. Do not attempt to access electrical panels or run water in wet areas without ensuring power is off and circuits are safe. Remember: oil, gas, and electrical safety always come first. If the area is hazardous or the leak is behind walls, call a professional right away.
Diagnostic flow overview: symptom to solution
A practical diagnostic flow starts with symptom recognition, then moves to identifying the likely cause, and finally selecting a safe, effective fix. First, categorize the symptom: surface dampness, active dripping, or hidden moisture. Next, consider common causes: a worn washer or valve, loose connections, appliance leaks, or a hidden pipe. Then evaluate the fix options: simple tightening or replacing washers for minor leaks, or a professional assessment for hidden, structural, or gas-related concerns. Throughout, document findings with photos and notes. If in doubt, escalate to a licensed plumber. This structured approach reduces guesswork, protects your home from further damage, and keeps you focused on verifiable steps rather than assumptions.
Step-by-step: fix the most common leak
- Shut off water at the main supply and document the area. 2) Dry the area completely to observe any ongoing drips. 3) Inspect the most common culprits first: faucet packing, toilet flapper, and appliance hoses; tighten or replace worn components. 4) Re-test by turning the water back on slowly and watching for leaks. 5) If a leak persists behind walls or in the slab, contact a licensed plumber for a thorough investigation. Pro tip: replace worn washers and seals with standard sizes and keep a small repair kit handy. Safety tip: always shut off power if water could reach electrical outlets or devices.
Prevention tips to avoid future leaks
- Schedule regular maintenance of appliances (dishwasher, washing machine, water heater) to replace hoses and seals before failure. - Inspect exposed piping annually for corrosion or wear and fix promptly. - Use a moisture meter or infrared camera to catch hidden leaks early, especially in basements and crawl spaces. - Maintain proper ventilation in bathrooms and kitchens to minimize condensation buildup. - Repaint or seal areas prone to moisture to deter mold growth. By adopting proactive habits, you reduce the chance of severe water damage and costly repairs. This proactive mindset aligns with Leak Diagnosis’s preventive guidance.
When to call a professional
If you encounter leaks behind walls, under slabs, or involving gas lines, do not attempt DIY fixes. Structural leaks, gas leaks, or any leak that involves electrical components requires licensed professionals with proper safety training and permits. If you notice significant water damage, persistent moisture after basic fixes, or recurring leaks in multiple locations, a professional assessment is essential. A pro will perform non-destructive testing, pressure tests, and use diagnostic tools to pinpoint the source without causing further damage. Timely professional help can save money and protect your family from potential hazards.
Steps
Estimated time: 1 hour 20 minutes
- 1
Identify the likely source
Observe the damp area, attempt to trace visible drip paths, and check nearby fixtures. Use a flashlight and a dry cloth to locate active moisture. Confirm you’re not chasing condensation from humid air.
Tip: Take photos and note times moisture appears to help with later diagnosis. - 2
Shut off water supply
If you suspect a significant leak, immediately shut off the main water valve. If only a localized leak is suspected, shut off the valve closest to the area. Do not ignore running water.
Tip: Keep a dedicated wrench or shut-off key handy for emergencies. - 3
Dry and re-check
Dry the area thoroughly and re-check after a period of use. A real leak will continue to show moisture or drips even after drying. Document changes with notes.
Tip: Use towels and a fan to speed up drying; avoid mold-prone conditions. - 4
Tighten or replace simple components
Check for loose fittings, hose clamps, and worn washers. Tighten as needed, but avoid over-tightening metal fittings. Replace washers or hoses if they show wear.
Tip: Only use manufacturer-specified parts to ensure compatibility. - 5
Test again and decide next steps
Turn water back on slowly and observe. If moisture returns, escalate to professional help. Document all findings for the technician.
Tip: If you smell gas or see standing water near gas lines, evacuate and call emergency services.
Diagnosis: Visible damp spots or unexplained moisture after moderate weather
Possible Causes
- highLeaking pipe or fitting
- mediumFaulty appliance connection (water heater, dishwasher)
- lowCondensation mistaken for a leak
Fixes
- easyShut off the main water supply and inspect the area for obvious drips
- easyTighten loose fittings and replace worn washers where accessible
- mediumPerform a dye test or use a moisture meter to locate hidden leaks
- hardCall a licensed plumber for structural leaks or main line issues
Questions & Answers
How can I tell if moisture is a real leak or condensation?
Real leaks persist despite drying and are not tied to weather. Condensation tends to appear after humidity spikes and dries with ventilation. Use a moisture meter or dye test to confirm source.
Real leaks persist after drying and aren’t tied to weather. Condensation is moisture from humidity and dries with ventilation. Use a moisture meter to confirm the source.
What should I do first when I suspect a leak?
Shut off the main water supply if you suspect a major leak, dry the area, and observe for ongoing moisture. Document evidence with photos and notes.
First, shut off the main water if you suspect a major leak, then dry the area and check for ongoing moisture. Document any evidence.
Can I fix leaks myself, and when should I call a pro?
DIY fixes are suitable for simple issues like a worn washer or loose fitting. If the leak is behind walls, involves the slab, or gas lines, call a licensed plumber immediately.
DIY fixes work for simple leaks like washers. For leaks behind walls, slabs, or gas lines, call a licensed plumber right away.
What tools help identify leaks without professional gear?
Common tools include a flashlight, moisture meter, dye tests, and a basic multimeter for integrated electrical checks. Infrared cameras can reveal hidden moisture behind walls.
Use a moisture meter, dye tests, and a flashlight. An infrared camera can reveal hidden moisture.
Is it dangerous to ignore a small leak?
Yes. Small leaks can cause mold, wood rot, and structural damage over time. Promptly address even minor leaks to minimize damage and costs.
Ignoring small leaks can lead to mold, rot, and bigger repairs. Address leaks quickly to minimize damage.
Watch Video
Main Points
- Identify real leaks by persistent moisture, not just damp spots.
- Start with simple checks: tighten fittings, replace washers, and dry area.
- If moisture persists or is behind walls, call a professional promptly.
- Prevent future leaks with routine appliance maintenance and good ventilation.