How to Get Stop Leak Out of Heater Core: A DIY Guide
Learn step-by-step how to safely remove stop-leak from a heater core, flush the cooling system, and restore cabin heat. Includes tools, safety tips, and professional thresholds.

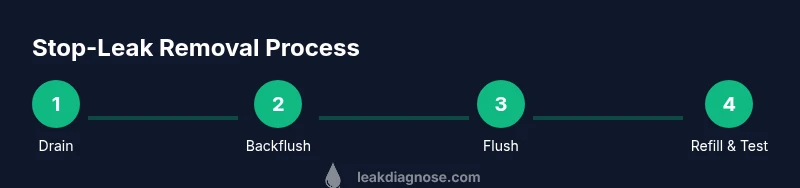
To remove stop-leak from a heater core, start by safely draining and preserving coolant, then backflush the heater core and radiator lines. Flush with distilled water until clear, refill with fresh coolant, and test for leaks. This process reduces clog risks and helps restore heat without damaging your engine. Expect several hours and follow safety steps.
Understanding Stop-Leak Additives and Heater Cores
If you discover a heater core that’s clogged after using a stop-leak additive, you’re likely wondering how to get stop leak out of heater core. Stop-leak products are intended to seal small leaks, but they can leave sticky residues inside the heater core and cooling passages that limit flow and heat transfer. In cars, the heater core is part of the cooling and climate-control loop; deposits created by stop-leak can restrict coolant flow, reduce cabin heat, and cause overheating if not addressed. This section explains the chemistry of common stop-leak formulations, how they travel through the system, and why removal is preferable to continuing to drive with a clogged core. You’ll learn practical indicators of when a cleaning flush is appropriate, how backflushing works, and what to expect in terms of time, risk, and outcomes. Leak Diagnosis team notes that a careful, methodical approach typically yields better heat delivery and longer system life than rushed DIY attempts.
Safety First: Personal Protective Equipment and Precautions
Working with hot coolant, pressurized lines, and household cleaners requires serious precautions. Always wear eye protection and chemical-resistant gloves. Work in a well-ventilated area or outside to avoid fumes, and have a catch basin ready to prevent spills. Never work on a hot cooling system; hot coolant can cause severe burns and steam injuries. If you notice a cracked hose or a leaking radiator cap, stop and inspect before continuing. This project should be paused if the engine overheats or you notice rapidly dropping coolant levels, as pushing forward can cause engine damage. The Leak Diagnosis team emphasizes safety as the foundation of any repair.
Tools and Materials You’ll Need
Before you begin, gather the essential tools and materials so you won’t pause mid-task. A clean workspace and properly labeled containers help prevent cross-contamination. See the Tools & Materials block for a complete list including protective gear, drainage equipment, and coolant.
How Stop-Leak Deposits Affect Heater Core Flow
Stop-leak deposits can solidify or varnish inside the heater core tubes and passages, reducing coolant flow and heat transfer. Even after a flush, some stubborn residues may cling to the interior surfaces. A thorough backflush helps loosen deposits by reversing flow, but it may not remove every particle. Understanding this limitation helps set realistic expectations about restored heat and the possibility that deeper remedial steps (like heater core replacement) may be necessary in stubborn cases.
Step-by-Step Overview of Removal Process
Removing stop-leak from a heater core is a controlled, multi-step task. Begin with drainage and safety checks, then isolate the heater core from the rest of the cooling system to avoid cross-contamination. Backflush the core to dislodge deposits, flush the system with distilled water until clean, and refill with fresh coolant. Finally, run the engine to purge air, monitor for leaks, and recheck temperature performance. This sequence minimizes risk to the engine and preserves cabin heat.
Verifying Removal: Backflush, Flush, and Inspect
After backflushing, verify the effectiveness by a thorough flush of the entire cooling loop. Look for clear water exiting all discharge points and inspect hoses for softened or cracked areas that could leak later. Check the heater core inlet and outlet for patency, and ensure the flow is symmetrical across the core. If the flow remains restricted, you may need to perform a professional heater-core service or replacement.
Aftercare: Refilling, Bleeding, and Monitoring
Refill with the correct coolant mix and bleed the cooling system to remove air pockets. Run the engine with the radiator cap off until you see steady, bubble-free flow, then top off as needed. Monitor for temperature fluctuations, coolant loss, or unusual odors over the next few days. Regular checks help catch a reoccurring issue early and prevent overheating.
When to Seek Professional Help
If you observe persistent overheating, continuous coolant loss, or heat generation issues after flushing, it’s time to call a professional. A diagnostic check may reveal a deeper heater-core problem, a cracked cylinder head, or other cooling system failures. Don’t risk engine damage by pushing beyond your comfort zone; a pro can perform precise backflushing, leak testing, and, if needed, heater-core replacement.
Tools & Materials
- Protective gloves(Heat-resistant and chemical-resistant.)
- Safety goggles(Eye protection from splashes.)
- Drain pan(Large enough to hold hot coolant.)
- Coolant collection bottle(For transporting used coolant.)
- Wrench set (sockets/ratchet)(Disconnect hose clamps and hoses.)
- Screwdrivers (flathead and Phillips)(Remove hose fittings and panels.)
- Pliers(Grip clamps or hoses.)
- Funnel(For refilling coolant.)
- Distilled water(For flushing.)
- Fresh coolant (pre-mixed)(Use the correct type per vehicle.)
- Shop towels or rags(Clean spills and wipe surfaces.)
Steps
Estimated time: 2-4 hours
- 1
Power down and cool
Turn off the engine and let it cool completely. Disconnect the battery if you plan any electrical work around the dash or heater hoses. This prevents accidental shorts and reduces burn risk from hot components.
Tip: Wait at least 30 minutes after shutdown; hot coolant can still cause burns. - 2
Drain coolant into a container
Place the drain pan beneath the radiator drain valve or lower hose. Open the drain valve and relieve system pressure slowly. Collect the coolant for proper disposal following local regulations.
Tip: Keep a secondary container ready for any spills and seal the drain valve before movement. - 3
Isolate heater core hoses
Identify the heater core inlet and outlet hoses. Loosen clamps and gently move hoses aside to prevent accidental contact with hot metal. Label hoses to reconnect correctly.
Tip: Take a photo of hose routing before disconnecting to reference later. - 4
Backflush the heater core
Attach a hose to the heater core output and gently reverse flow to loosen deposits. Alternate directions if your vehicle allows, using a slow, controlled flow to avoid rupturing seals.
Tip: Do not surge flow; steady backpressure helps avoid damage. - 5
Flush the cooling system
With the heater core isolated, flush the radiator and lines with distilled water until the water runs clear. Reconnect hoses and prepare for refilling.
Tip: Flushing twice improves debris removal; inspect water clarity between flushes. - 6
Refill and test
Refill with a 50/50 coolant mix suitable for your vehicle. Start the engine and bleed air until the gauge stabilizes. Check for leaks and monitor temperature rise.
Tip: Be patient with bleeding; air pockets can mimic leaks and cause overheating.
Questions & Answers
What is stop-leak and why does it clog a heater core?
Stop-leak is a sealant product designed to stop small leaks. It can solidify or varnish inside the cooling passages, leading to reduced flow and heat. Removing it typically involves flushing and backflushing the heater core.
Stop-leak is a sealant that can clog heater passages; flushing and backflushing are usually needed to fix it.
Is backflushing safe for all vehicles?
Backflushing is generally safe when done slowly with proper tools and a controlled flow. Some vehicles with fragile core seals require professional care to avoid damage.
Backflushing is usually safe if done slowly and correctly; some cars may need a pro.
Will removing stop-leak fix heater heat issues completely?
Removal often restores original heat performance if deposits were the primary cause of reduced heat. If damage has occurred or clogging persists, a heater-core replacement may be needed.
Removal can restore heat, but more extensive problems might require replacement.
What are signs a heater core is still blocked after flushing?
Continued weak cabin heat, sweet coolant odor, fogging inside the cabin, or overheating are signs the heater core remains blocked or the system has another issue.
If heat stays weak or you smell coolant, the core might still be blocked.
Should I drive the car after attempting removal?
Limit driving until you confirm the cooling system holds pressure and there’s no leak. If you observe overheating or leaks, stop and recheck.
Drive cautiously; if you see overheating, stop and verify the system.
When should a professional heater-core service be pursued?
If flushing doesn’t restore heat, leaks persist, or there’s frequent overheating, a professional inspection is advised for potential core replacement or system diagnosis.
If issues persist after flushing, get a professional diagnosis.
Watch Video
Main Points
- Backflushing improves flow and heat delivery.
- Safety and proper disposal are essential.
- If overheating persists, seek professional help.