Do You Have a Water Leak? A Practical Troubleshooting Guide
Urgent guide to identify and fix water leaks fast. Learn a practical, step-by-step troubleshooting flow to stop drips, protect your home, and prevent damage.

Most likely a dripping faucet, a faulty toilet flapper, or a hidden supply line leak. Start by turning off the main water valve to stop the flow, then check the obvious fixtures for drips. If you can’t locate the source quickly, use a dye test or meter reading to narrow it down. Acting fast saves water and prevents damage.
What counts as a water leak and why it matters
If you’re asking, do you have a water leak, you’re not alone. Most homeowners notice damp spots, a telltale drip, or a restless toilet tank before they realize a leak is silently wasting water and risking damage. According to Leak Diagnosis, the moment you suspect a leak is the moment you should start a quick, methodical check. Unaddressed leaks can lead to warped floors, mold growth, and higher utility bills—problems that escalate far beyond the initial drip. The good news is that most leaks are identifiable with a calm, organized approach. Start by surveying the most common culprits: fixtures, hoses, supply lines, and pipes in accessible areas. Even a small drip, if left unchecked, can add up to significant water loss over days or weeks. In this guide we’ll outline a practical flow so you can decide whether you can tackle it yourself or if it’s time to call a professional. The Leak Diagnosis team emphasizes safety first, and we’ll flag where professional help is wise.
Quick checks you can do right now
Before you panic, run through these fast checks. Look for the most obvious leaks: dripping faucet, toilet tank that empties unusually fast, or a visible pool under an appliance. Check outside taps and hose bibs for mineral buildup or loose connections. If you have a water meter, watch it for movement when all fixtures are off; even a slow change indicates a hidden leak. Also inspect areas with recent water events—under sinks, around the water heater, and behind washing machines. If you can reproduce the leak, note the time and the fixture involved. Documenting your observations makes it easier to communicate with a plumber. Do you have a water leak? The quickest answers often come from these plain-language checks rather than diving into complex repairs. Remember, if electricity or gas is involved, or if you’re unsure about any step, pause and seek professional guidance.
How to trace the source: common culprits
Most do-it-yourself investigations reveal a few recurring sources. A worn toilet flapper or fill valve is a frequent offender, especially in older homes. Faucets leak at the packing nut or aerator; tightening or replacing these parts can halt drips. Appliance lines—dishwashers, washing machines, and refrigerators with ice makers—use flexible hoses that wear over time and can fail at the connectors. P-traps and drainage pipes under sinks are also common, as are hidden leaks behind walls from aging copper or polybutylene pipes. In some cases, the leak starts where water enters your home: exterior hose connections, roof penetrations, or gaps around windows where rainwater seeps in. The key is to test and isolate one fixture at a time while keeping the rest off. Throughout, stay mindful of the possibility that a “do you have a water leak” situation may involve multiple points of entry, especially in multi-story homes.
Reading your water meter and consumption signals
A practical way to confirm a leak is to monitor water usage. With the main shut-off open, read the meter, wait a couple of hours without using water, then recheck. Any change suggests underground or concealed leaks. You can also use the historic bill trend as a clue; sudden spikes or a higher-than-usual consumption pattern may indicate a leak somewhere in the system. If available, a digital meter with leak detection features can provide alerts. Note that many leaks occur inside walls or in poorly lit spaces, so you may need to rely on visible signs like damp drywall, bubbling paint, or stained flooring to locate the problem. The goal is to narrow down the area so you don’t replace the wrong part.
Diagnostic flow overview: symptom to fix
Start with the symptom: damp spot, sound of running water you can’t locate, or a rising meter. Then consider the most likely causes in order of probability: fixtures first, then supply lines, and finally hidden pipes behind walls. If the symptom is a drip from a faucet, the fix is often simple: replace a seal or cartridge. If it’s a toilets leak, the flapper seal or fill valve is usually to blame. For appliances, inspect hoses and pan under the unit. If none of these are the culprit, you may be dealing with a hidden leak and require pressure testing or camera inspection. Always document findings and test after each fix. If the leak persists after the obvious steps, escalate to professional diagnosis to prevent further damage.
Step-by-step fix for a common leak
A typical household leak—like a dripping faucet or a running toilet—follows a predictable repair path. First, turn off the main water supply to stop the flow. Then identify the fixture, gather basic tools, and inspect seals, washers, and valves. If a toilet is leaking, inspect the flapper and fill valve, replacing worn parts as needed. For faucets, inspect the cartridge or packing nut; replacing worn components often stops the drip. Always test after each adjustment by turning water back on and observing for renewed dripping. If the leak remains, the problem is likely more complex or concealed, and it’s time to call a professional.
Safety, prevention, and when to call a pro
Working with water presents slip hazards, electricity near wet areas, and the risk of mold. Always shut off power to affected areas if you suspect a live electrical fault, and use a flashlight rather than hot work near damp spaces. Wear gloves, goggles, and closed-toe shoes. Never attempt major pipe repairs in freezing temperatures or when you’re unsure about the plumbing layout. Simple fixes—like tightening fittings or replacing a worn washer—can often be done by a confident DIYer, but more complex leaks behind walls, active gas lines, or meter movement that won’t stop require professional intervention. The Leak Diagnosis team recommends starting with basic checks, then calling a licensed plumber or a water-damage specialist if the leak is not clearly identified within a short time frame.
Practical next steps and prevention
Once you’ve stopped the leak, clean up the area and monitor for signs of residual moisture. Run your water usage through a few cycles of your appliances to ensure no new drips appear. Consider upgrading old fixtures, installing leak detectors on appliances and under sinks, and labeling shut-off valves for rapid response in future emergencies. Regular maintenance—such as replacing worn hoses and flushing water heaters—can prevent leaks from turning into serious damage. Finally, keep a simple leak-response kit: towels, a bucket, a flashlight, a wrench, and a phone with emergency contact numbers. Do you have a water leak? A prepared homeowner is less likely to panic and more likely to recover quickly.
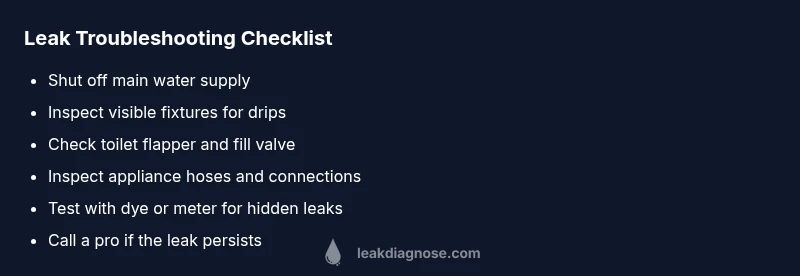
Steps
Estimated time: 60-90 minutes
- 1
Shut off main water supply
Locate and close the main shut-off valve to stop water flow. This prevents further damage while you identify the leak source. If the main is hard to reach, shut off individual valves behind fixtures as a temporary measure.
Tip: If you’re unsure where the main shut-off is, check near the home’s perimeter where the water line enters. - 2
Inspect obvious fixtures and hoses
Look for visible drips at faucets, hoses, and the toilet base. Gently wiggle hoses and fittings to detect looseness. Replace worn washers or seals as needed, starting with the easiest access points.
Tip: Keep a bucket handy to capture any residual water while inspecting fittings. - 3
Check the toilet for leaks
To test the toilet, perform a dye test: add a pinch of dye in the tank and wait 15–30 minutes without flushing. If color appears in the bowl, the flapper or fill valve needs attention. Replace worn parts following manufacturer guidance.
Tip: If you hear continuous running after a flush, the flapper is a common culprit. - 4
Inspect faucet mechanisms
Shut off water under the sink and remove the handle or aerator to check cartridges and packing nuts. Replace worn o-rings or washers; reseat components and reassemble. Turn water back on slowly and watch for drips.
Tip: Carry spare washers in a small kit for quick swaps. - 5
Examine appliance supply lines
Pull appliances away from walls and inspect hoses for cracks, bulges, or loose clamps. Replace compromised hoses and ensure clamps are secure. Check the drip pan and outlet lines for moisture.
Tip: Only run cycles after you’ve tightened and tested each connection. - 6
Check under sinks and in cabinets
Look for moisture on pipes, joints, and the P-trap. Tighten loose connections and clear any debris that hides leaks. If you see slime or mold, address moisture quickly to prevent damage.
Tip: A flashlight and mirror can help you inspect hard-to-see corners. - 7
Perform a dye or meter test for hidden leaks
If you still suspect a leak after visible checks, use a dye test in the suspected area or monitor the water meter over a few hours without using water. Hidden leaks often require professional detection.
Tip: Document meter readings with a photo for reference. - 8
Recheck and monitor after fixes
Turn the water back on gradually and recheck each area for renewed dripping. If leaks reappear, record the symptoms and seek professional help promptly to prevent further damage.
Tip: Schedule a follow-up check within 24–72 hours to ensure stability.
Diagnosis: Visible damp spots, sounds of running water, or rising water meter when fixtures are off
Possible Causes
- highLeaking fixture (faucet, toilet flapper, valve)
- mediumWorn appliance hoses (washing machine, dishwasher, fridge ice maker)
- lowUndetected supply line leak (under sink, in attic, basement)
Fixes
- easyShut off main water supply; tighten or replace gaskets, washers, or cartridges; retest with water on
- easyReplace worn appliance hoses or tighten connections; inspect pan under units to catch drips
- hardIf leaks persist or are hidden, perform pressure testing or call a licensed plumber for camera/diagnostic work
Questions & Answers
What are the earliest signs of a water leak in a home?
Early signs include damp spots, a persistent drip, unusual sounds of running water, and rising utility bills. If you notice any, start a quick inspection and document what you see.
Look for damp spots or a running sound—these usually indicate a leak; start by checking common fixtures and meters.
What tools do I need to check for leaks?
You’ll typically need a flashlight, bucket, wrench set, pliers, dye tablets or food coloring, towels, and access to the water shut-off valves. A digital meter with leak alerts helps for hidden leaks.
Grab a flashlight, towels, and a few basic tools; a shut-off valve key helps you stop water quickly.
Is it safe to attempt DIY repairs for a leaking toilet?
Yes, many toilet leaks come from the flapper, fill valve, or seals and can be fixed with basic parts. If you’re not comfortable or the leak persists after a replacement, call a plumber.
DIY fixes are possible for common toilet leaks, but don’t hesitate to call a pro if the leak continues.
When should I call a professional?
Call a professional if the leak is concealed behind walls, involves gas or electrical hazards, or if you can’t locate the source after systematic checks. A quick expert assessment can prevent major damage.
If you can’t locate the leak or it’s in walls, bring in a professional for safety and efficiency.
Can a small drip really waste water?
Even small drips add up over time, increasing water bills and risking mold. Address small drips promptly and monitor nearby surfaces for moisture.
Yes, even small drips waste water; fix them early to save water and prevent damage.
How can I prevent leaks in the future?
Regular maintenance, up-to-date hoses, leak detectors, and promptly replacing worn components can prevent many leaks. Keep an eye on old fixtures and appliances before they fail.
Prevent leaks with regular maintenance and detectors; replace worn parts before they fail.
Watch Video
Main Points
- Act quickly to stop the water flow when leaks appear.
- Identify the source with a methodical, fixture-by-fixture approach.
- Use dye tests or meter readings to confirm concealed leaks.
- Many leaks are DIY-friendly, but some require a pro.
- Prevent future leaks with maintenance and early detection.